If you’re looking to increase the look of your yard floating deck is a perfect idea. A floating deck isn’t attached to a structure but is built on the ground, supported by a set of posts or piers. A floating deck can be an enjoyable and rewarding DIY task, but it will require meticulous planning as well as execution. This article will give you a step-by-step guide to building floating decks. We will provide the tools needed as well as the materials and techniques to make the task easier.
What is a Floating Deck?
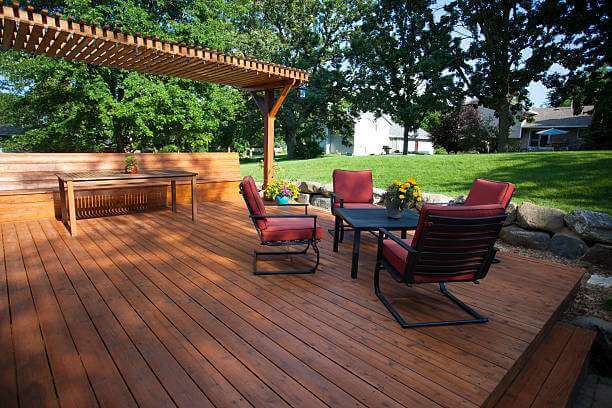
The floating deck can be described as a form of the deck that’s not connected to a structure or other structure. Instead, the deck “floats” on top of the ground and is supported by a set of posts or beams. They are typically built in gardens, backyards, or any other outdoor space in order to create a beautiful and practical space to enjoy outdoor living and entertainment.
The primary benefit of floating decks is they can be constructed in places that traditional decks cannot. It doesn’t require a solid foundation or an attachment to a structure and can be constructed on the uneven or sloped ground or even on the top of a sandy or rocky area. This makes it an appealing option for homeowners who wish for the most inaccessible outdoor space.
To construct floating decks, the initial steps are to clean the ground by clearing the grass, weeds and other plants. Next, put in the support beams or posts supporting the deck from the ground. They could be constructed from metal, wood or other materials according to the design and position that the deck is located.
After the support system is installed, The deck boards are placed on top of it, usually using a screw or any other type of fastener. The boards could be constructed from composite materials, wood or any other material, according to the style and the durability that the deck will provide.
A floating deck is an incredibly versatile and appealing option for entertaining and outdoor living. It is an excellent feature for your garden or backyard.
Tools and Materials Needed to Build a 12×12 Floating Deck
The construction of a floating deck 12×12 requires many tools and supplies. Below is a listing of necessary equipment and materials required for building a 12×12 floating deck:
Tools:
- A Circular saw, also known as a mitre saw
- Drill bits and drill bits
- Hammer
- Level
- Measuring tape
- Post hole digger
- Shovel
- Set of sockets or wrenches
- Speed square
- String line
- Table saws or handsaws
- Wheelbarrow
Materials:
- Concrete mix
- Decking boards
- Deck screws
- Gravel
- Joist hangers
- Landscape fabric
- Post anchors
- Pressure-treated lumber
- Metal stakes or Rebar
- Sand
- Stain or sealer for wood
The exact quantity of each component is contingent on the style and the size of the deck, in addition to local building regulations and codes. It is essential to consult local authorities to make sure that all construction laws and codes are adhered to.
In addition, safety equipment like gloves, goggles and a dust mask must be worn to safeguard against injuries and dust particles that are blown in from the air.
Steps to Build a Floating Deck
Step 1: Plan and Design Your Floating Deck
Before you begin making your floating deck, you must sketch out and design the deck first. This involves determining the size of the deck, its shape, and where you will build your deck. You can use graph paper and pencil to draw your deck layout or the free deck design tool to make digital plans. Your deck plan should contain the following elements:
- The size of your deck
- The place where the posts or the piers
- The spacing between the posts or the piers
- The size and number of the Joists
- The kind and size of decking materials.
Once you have your design and plan, you can collect the required tools and materials.
Step 2: Gather Materials and Tools
To construct your floating deck, you‘ll need the following items:
- Concrete posts or piers
- Pressure-treated lumber for frame and Joists
- Deck screws
- Joist hangers
- 2x4s to brace
- Decking material (wood composite, PVC)
- Stone or gravel for the base
In addition to these items, in addition, you’ll also require some of the tools listed below:
- Circular saw
- Jigsaw
- Drill
- Hammer
- Level
- Tape measures
- Square
- Shovel
- Wheelbarrow
Once you have all the equipment, materials, and tools, you can begin creating your floating deck.
Step 3: Install the Posts or Piers
The first step to building your floating deck is to put in posts or piers. They’ll be able to support the deck‘s frame and help keep it at a level. This is how you can install the posts or the piers:
- Make holes for posts and piers using the shovel. It is recommended that the hole’s depth must be at least one-third of its height.
- Place a gravel or crushed stone layer in the hole’s bottom to increase drainage.
- Put posts or piers into the holes. Use an appropriate level to ensure they are level and plumb.
- The holes should be filled with cement, then let dry for a minimum of 24 hours.
Step 4: Set the Deck Posts and Footings
Once the layout is completed, It’s time to begin making foundations and posts on the deck. The footings serve as the foundation of the deck, providing additional support to the posts, which then support your deck’s structure. The posts must be placed in each corner and every eight feet around the deck’s border. Post-hole digger to make into the post’s holes. The holes must measure about two feet in depth and twelve inches across.
The next step is to mix and pour concrete footings into the deck. The footings need to be laid to a depth of six inches below the frost line within the area you want to build. This will prevent the deck from breaking in the winter months. After the footings have been poured, let them cure up to 48 hours prior to beginning.
Step 5: Install the Deck Frame
After the posts and footings are set, it’s now time to build the frame for your deck. The frame is comprised of joists and beams and a ledger board. It is connected to the house and supports the deck at one end. The beams are connected with the leadger board and the posts, and the joists are connected to the beams.
Begin by attaching your ledger boards to your home using the lag screws. After that, you can attach your beams to the posts using carriage bolts. Ensure you employ a level to ensure your beams remain straight and level with one another. After the beams are placed, connect the joists onto the beams using hangers for joists. Make sure that you keep the joists spaced no greater than 16 inches.
Step 6: Install the Deck Boards
Once the frame is in place, it is time to put it in your deck boards. Begin by placing the first board on one side of your deck. Make sure that it’s aligned with the edges of the frame. Utilize deck screws to secure the frame to the board. Continue to lay boards, until you’ve completed the deck.
When you install the boards, ensure that you leave a slight gap between the boards. This allows for expansion and contraction because of variations in humidity and temperature. You can employ the chisel or pry bar to make the gap.
Step 7: Build the Deck Stairs
When your deck sits higher than a foot above the ground, then you’ll need to build steps to allow access to your deck. Start by determining the number of steps you’ll require. The rule of thumb is that every step should be about 7 inches tall and 11 inches deep.
To build the stairs begin by installing the stringers. The stringers act as supports for the stairs. They are connected to the frame of the deck using Angle brackets. Then, cut the stair treads to the appropriate size and then attach these to stringers using screws.
Then, connect the stair risers to the stringers. The risers are the boards that are positioned between the treads. Use a level to ensure the stairs are level and level.
Step 8: Finish the Deck
Once the deck is constructed and the deck trimmed, it’s time to finish the job. Begin by cutting the deck boards to be flush using the frame using circular saws. Putting a railing on the deck is then possible to ensure safety. Be sure to verify the building codes in your area for the height of railings.
The next step is to finish the deck with a stain or seal to keep it safe from the elements. It is possible to also put in the final touches, like furniture or lighting, to create an enjoyable and relaxing area.
Conclusion
In the end, building floating decks are the perfect option to increase the worth and function of your backyard. Following these step-by-step guidelines and using the correct equipment as well as materials, anybody can create a stunning floating deck that can last for a long time. So why not begin your deck today and reap the benefits of having a gorgeous and practical outside living area?
You may read this article importance of blocking between joists in deck construction.
3 thoughts on “How to Build a Floating Deck Step by Step Guide”