The construction of composite deck stairs is an enjoyable and useful project for homeowners who wish to increase the value of their outdoor area. Composite decking, created from an amalgamation of plastic and wood fibers, provides durability, low maintenance, and a broad selection of design options.
If you’re planning to add stairs to your composite deck or building from scratch, this guide will provide important tips and methods to build beautiful and sturdy staircases that fit with your deck’s overall style.
The introduction to this guide will explain the advantages of composite decking, like its resistance to insects, rot and moisture, which makes it a great option for outdoor stairs.
The guide will also outline the benefits of making your own stairs, such as cost savings and custom choices. In addition, the introduction will highlight how important safety is during the construction of deck stairs, which includes the adherence to building codes in the area and the best practices for creating structurally sound stairs. With this guideline, homeowners can successfully take on their composite deck stairs projects and make a practical and attractive extension to their outdoor area.
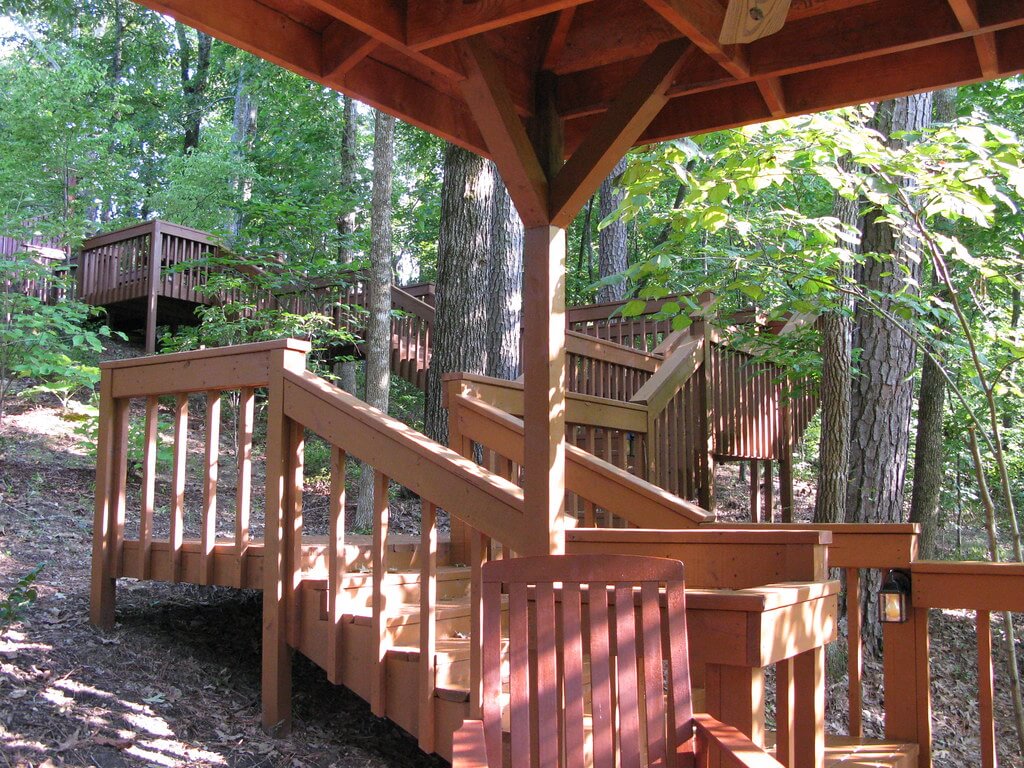
Stringer spacing for composite deck stairs
When making composite deck stairs, one important aspect to take into consideration is the spacing between the stringers. Stringers are the supports diagonally that keep the steps of the staircase in place. Their spacing plays an important role in ensuring the stability and security of the staircase.
The best spacing of the decking’s stringers will depend on the specifications of the manufacturer and the local building codes; however, the general rule is to put the stringers at least 16 inches in the distance. This gives enough support for the stairs and prevents them from bouncing or sliding while the steps are used.
The type of decking made of composite utilized as well as the length and width of the steps, as well as the general height of the stairs could also influence the correct spacing of the stringers. Following the guidelines of the manufacturer and the local codes for the building is vital to ensure safety standards and also to avoid possible issues in the future.
Correctly spaced and securely installed stringers are essential to creating sturdy and safe wooden deck staircases. It is always advisable to read the instructions of the manufacturer and seek out professional assistance in case you need to confirm you have the right stringers spaced to match the specific composite decking material employed and the style of the stairs to be constructed.
Building a composite deck requires numerous steps. Here’s an in-depth guide on how to go about it:
Step 1: Gather Materials and Tools
- The Composite Decking Boards You’ll require enough decking boards made from composite for the treads on your staircase. Take measurements of the width of the staircase and determine the number of boards needed according to the size of the boards. Select composite decking boards specially designed for outdoor use and that are compatible with the deck’s existing decking material.
- Pressure-Treated Lumber for Stringers These are the supports diagonally that keep the steps in the right place. You’ll require pressure-treated lumber that’s suitable for use outdoors and is able to stand up to the elements. The dimensions and weight of the lumber will be contingent upon the number of steps as well as how far apart the stringers are in accordance with the plan you’ve drawn.
- Galvanized Screws and Nails: Pick galvanized screws and nails specifically designed to be used outdoors and are impervious to corrosion. You’ll require them to connect the treads, stringers, and risers to the deck framing.
- Circular Saw Circular Saw is crucial for cutting wood decking, composite boards, pressure-treated lumber, and other materials to the needed lengths and angles.
- Level The importance of a level is to ensure that the treads, stringers and risers are even and straight throughout the installation process and is essential to ensure safety and stability.
- Drill: You’ll require appropriate drill bits to pre-drill holes for nails or screws to keep the wood from splitting.
- Measuring Accurate Tape measurements are vital to ensure the proper spacing and alignment of the staircase. A measuring tape is required to measure the height, width as well as the length staircase as well as other elements.
- Carpenter’s Square The carpenter’s square can be useful to make sure that angles and cuts are exact, especially when cutting stringers, and ensure that they are square during the installation.
- Safety Gear: Remember to wear the appropriate safety equipment, like gloves and goggles, to shield your eyes and hands while drilling, cutting and installing.
The possession of all the materials and equipment available prior to starting the work will allow for the construction process to be more efficient and ensure a professional-built staircase made of composite that is sturdy and safe. Follow the manufacturer’s guidelines and safety guidelines when working with equipment and materials. Also, review the local codes for the building to make sure you are in that you are in compliance with local regulations.
Step 2: Measure and Plan
Certainly! The next step in building the composite deck staircase is determining and making plans. This is a comprehensive explanation of the process:
- Find the Height of the Deck Take a measuring tape to determine the height of your deck from the ground to the highest deck. The measurement determines the number of steps you will need to build your stairs. In general that each step must have an increase (height) approximately 8 inches to provide maximum safety and comfort.
- Plan the layout of your Stairs. Based on the deck‘s height and the rise you want on each of your steps, design the design of your staircase. Divide the height of your deck in half by each rise to figure out the number of steps required. For instance, if the deck has a height of 40 inches and you wish the steps to each have an increase of seven inches, then you’ll require six steps (40 inches x 7 inches equals 5.71, which is rounded into the number of steps).
- Determine your Run along with the Tread Depth. The run (depth) for each step can be determined using tread depth which is the horizontal distance that runs from the edge of the first tread to the edge of the subsequent tread. For a general guideline, it is recommended that the run be between 10 and 11 inches for safety and comfort.
- Find the stringer spacing: Stringers serve as supports diagonally that keep the steps in the right place. The spacing between the stringers will vary based on the size of your steps and the decking material you’re employing. As a general rule of thumb, the most space between stringers in composite decking is typically 16-24 inches.
- Verify Code Requirements: Examine any local regulations and building codes to determine any specific requirements for staircase dimensions as well as rise and run or stringer spacing. Be sure to adhere to all codes in force to ensure your stairs are safe and conform to standards.
- Create a Comprehensive Plan Based on the measurements and calculations you have made, Create a precise plan for your staircase. It will contain the steps’ number, spacing between the stringers and the measurements of the risers and treads as well as any other pertinent information.
- Double-check Your Plan: After you’ve created your plan, double-check the measurements of calculations, dimensions, and measurements to ensure that they are accurate. It is essential to create a well-thought-out, thorough plan before beginning the construction.
A proper measurement and plan are important to ensure the stairs on your composite deck are comfortable, safe and in compliance with the code. Make sure you take measurements and plan your staircase for a successful building process and a well-constructed series of steps that increase the utility and look of your deck.
Step 3: Cut and Install Stringers
Cutting and putting in the stringers is a crucial process when making stairs made of composite decking. Here’s a comprehensive detail of the procedure:
- Measurements for Transfer: With the blueprint as a guideline, transfer the measurements for every step’s rise and runs onto your pressure-treated timber for your stringers. Mark the top of your first measure (rise) as well as the vertical length of the step’s first (run) at the upper edge of the first stringer.
- Mark the tread and riser Placements: Using the diagram you have drawn, mark the location of the risers and treads on the first stringer. Make use of a carpenter’s square and make sure that the marks are parallel to the run and rise measurements.
- Cut the stringers using a circular cut saw the lines of the first stringer in order to create the form of the steps. Repeat the procedure for the other stringers, ensuring that the stringers are cut in the same size for a uniform staircase.
- Test the fit of the stringers. Set the stringers against the framing of the deck and align their edges with those of the deck, and making sure the stringers are straight and even. Make any adjustments needed to ensure your stringers have been aligned and secure against the frame of your deck.
- Attach the stringers to the deck framing. After the stringers have been placed and are securely positioned to the framing of your deck, join them with a nail or galvanized screws. Screws or nails are driven through the stringers and into the framing of the deck at each riser and tread by following the marks on the stringers to guide you. Check your stringers remain securely connected and don’t wobble.
- Install Bracing or Blocking: To ensure stability, it is possible to put bracing or blocking between stringers. This is done by securing additional wood pieces treated by pressure to the stringers on their tops and at the bottoms or using brackets made of metal to reinforce the structure in accordance with local building codes and regulations.
- Double-check for levelness and plumpness. After putting in the stringers, double-check plumpness and levelness in order to ensure your stairs remain secure and safe. Make use of a level as well as a carpenter’s triangle to make sure the stringers are vertical and that the risers and treads are straight.
The correct cutting and installation of the stringers correctly are essential for the safety and stability of your deck stairs made of composite. Make sure you take measurements, mark the area, cut and then attach the stringers according to the plans as well as local building codes to make sure you have a sturdy and professional staircase that increases the utility and looks the deck.
Step 4: Install Treads and Risers
Installing risers and treads is the next stage after cutting and putting in the stringers used in the construction of staircases made of composite. This is a thorough description of the procedure:
- Create the treads and risers. Cut and measure the decking boards made of composite in the correct length to fit the risers and treads. Be sure to take into account any spacing or overhang requirements in accordance with the plans and the local building codes.
- Install Risers: Begin by putting in the risers, which are the boards that run vertically and are placed across the treads. Place a dot of construction glue on the side of each riser and place it at a level against the upper part of the tread. Utilize a level and a carpenter’s square to make sure that the risers remain plumb and level. Connect the risers to stringers with galvanized screws or nails, following the manufacturer‘s guidelines and the local building codes.
- Install treads: Once the risers have been firmly placed, it’s time to set the treads on the vertical boards you walk over. Place the construction adhesive on top of every riser and then place the tread on top, ensuring that it’s aligned with the edge on the front of the riser and equally spaced from the adjacent treads. The treads should be attached to risers as well as the stringers with galvanized screws or nails in accordance with the manufacturer’s instructions as well as local building codes.
- Repeat the process. Continue to put in the other treads and risers, using the same procedure, until the entire process is completed.
- Double-check for levelness and stability. After putting in all the risers and treads, Double-check the stability and level. Make use of a level as well as a carpenter’s square to make sure that all treads are level and the risers are level. Be sure to check for any movement or wobbling in the staircase, and then reinforce the stairs with screws or nails if necessary.
- Finish the edges: If you wish, you could attach fascia boards or cut pieces along the edges of the risers and treads to give them a neat and polished appearance. This can be accomplished using galvanized screws and construction adhesive or nails, according to the instructions of the manufacturer.
Installing the treads correctly and risers properly is vital to creating a sturdy and safe set of deck stairs made of composite. Be sure to follow the plans and local building codes as well as the manufacturer’s instructions and make sure to make sure all components are level, straight and securely anchored for the best quality and durability.
Step 5: Add Finishing Touches
Giving your stairs a final touch staircase made of composite is the last stage in finishing your task and will improve the overall look and security of your staircase. This article will provide a complete explanation of the process:
- Sand and smooth edges After putting up the risers and treads, you might want to sand any edges that are rough or corners to give them smooth edges. Utilize a sanding block or sandpaper to smooth all sharp edges, splinters, or sharp corners in order to ensure that the staircase is safe and comfortable for use.
- Seal or paint. Based on the kind of composite decking you have chosen, you might want to seal or paint your stairs to guard the deck against elements and enhance its appearance. Follow the recommendations of the manufacturer when painting or sealing composite decking and select an excellent, weatherproof product suitable for outdoor usage.
- Install handrails: If your local building codes call for handrails on your deck stairs, then you might have to put them in to add a final touch. Handrails can offer added safety and stability, particularly when stairs are of a large size or length. Be sure to follow the recommendations of the manufacturer and local building codes to ensure installing handrails and make sure they are secured to the staircase and to the structure that is adjacent.
- Clean up: After all final steps are done, carefully clean the space, clearing all debris and tools or even materials. This will leave your deck stairs clean and tidy and ready to use.
The final touches you add to your wooden deck staircase are a vital element in completing the project and making sure that your stairs are functional, safe and visually appealing. Use the guidelines of the manufacturer as well as local building codes and the correct installation methods to create a professional, polished look for your deck stairs made of composite.
Step 6: Finish and Maintain
“Finish and Maintain” is the last step to build composite deck stairs. it is about ensuring that the stairs are finished properly and maintained to extend their life span and ensure they look their best. This is a thorough description of the step:
- Examine any problems. Check the stairs of your composite deck for indications of wear and tear, like cracks, splinters and loose bolts. Make any necessary repairs to stop further damage from occurring and ensure the stability and security of the stairs.
- Clean regularly: Frequently clean your deck stairs made of composite to eliminate dirt or debris and stain. Make use of a gentle cleaner designed for composite decking and a mop or brush that is soft to keep from scratching the surface. Make sure to rinse thoroughly after cleaning to eliminate all dirt and residues.
- Avoid damaging practices: Avoid damaging activities that can damage the composite deck, like making use of aggressive cleaners, harsh chemical products as well as sharp objects that could scratch or gouge the deck. Avoid moving heavy furniture or objects over the stairs to avoid scratching or dents.
- Apply paint or sealant. Depending on the kind of decking material made from composite, it is possible to apply a sealant again or paint to shield the staircase from UV rays as well as moisture and other environmental elements. Follow the recommendations of the manufacturer’s sealing or painting and then reapply if necessary.
- Maintain Handrails If your deck made of the composite staircase has handrails, you should regularly check and maintain their stability of them to ensure their security and security. Fix any loose fasteners. Repair any damaged components and seal them as necessary.
If you properly finish and maintain those stairs made from composite you will extend the life of your stairs and ensure they look good for a long time to be to. Routine inspections and cleaning and maintenance will help avoid issues and guarantee the safety, durability and beauty that your stairs are made from composite.
You Must read about the related article
I really wanted to thank you for these marvelous tips you are showing at this website. My extensive internet investigation has at the end of the day been recognized with awesome facts to talk about with my friends. I feel lucky to have come across the website and look forward to have more excellent reading time here. Thanks a lot once again for all the details.